Friday, September 17, 2010

Pizza Puff

ok..I was sure I had posted this in here before.... these were an easy snack and a hit with visitors for a tasty appetizer.... so I can find it again :(need it for a party!)
compliments of the Rachael Ray magazine....
INGREDIENTS:
3/4 cup flour
3/4 teaspoon baking powder
3/4 cup whole milk
1 egg, lightly beaten
4 ounces mozzarella cheese, shredded (about 1 cup)
4 ounces pepperoni, cut into small cubes (about 1 cup)
1/2 cup store-bought pizza sauce
2 tablespoons finely chopped fresh basil
1 red bell pepper, sliced Frozen Assets
TIP: Freeze the baked puffs in a single layer on a baking sheet, then transfer to a freezer bag. To reheat, bake the frozen puffs on a baking sheet in a 350° oven for 8 to 10 minutes.
DIRECTIONS:
Preheat the oven to 375°. Grease a 24-cup mini-muffin pan. In a large bowl, whisk together the flour and baking powder; whisk in the milk and egg. Stir in the mozzarella and pepperoni; let stand for 10 minutes.
Stir the batter and divide among the mini-muffin cups. Bake until puffed and golden, 20 to 25 minutes.
Meanwhile, microwave the pizza sauce until warmed through, then stir in 1 tablespoon basil. Sprinkle the puffs with the remaining 1 tablespoon basil. Serve the puffs and red pepper slices with the pizza sauce for dipping.

UPDATE: in the dry ingredients I add dry herbs like Italian seasoning , (or separately I add dried oregano , basil) , garlic powder, onion powder and even a pinch of curry. Anything you’d put on pizza goes ! It adds so much more flavor. I also sprinkle chopped  fresh basil and a little fresh grated Parmesan on top of the muffins BEFORE I put them in the oven. This is the recipe I  get the most requests to make for any party. 

Sunday, August 15, 2010

Daring cooks' August Challenge reveal

The August 2010 Daring Cooks' Challenge was hosted by LizG of Bits n'Bites and Anula of Anula's Kitchen. They chose to challenge Daring Cooks to make pierogi from scratch and an optional challenge to provide one filling that best represents their locale.

My area is very ethnic and we celebrate our diversity. You'll find an abundance of polish, Italian, Greek , Russian, Pa Dutch/German, and I've even experienced food & culture from friends who's heritage was Ukrainian, Asian , and Lithuanian. Needless to say, Pierogi are quite rampant in these parts and I have made them from scratch many times. I've never had a dessert pierogi though....and I was going to try this, but when I tried to come up with something that represents our locale, all I could think of was pizza - since Old Forge is right next to us and boasts the name of our nation's Pizza Capital, I went for a savory dish instead. I think I'll try the dessert ones next.
The filling came from watching Giada on food network make pizza pockets. I did not hunt down the recipe, instead I just "winged" it. The dough and filling recipe I used will be listed at the bottom.

Thanks again to all the wonderful people behind The Daring Kitchen for making these challenges possible. I am pleased that with each challenge, I do learn something new along the way!

First step- Have the flour and egg ready to make the dough and already have filling, just have to mix it. I chose to make a savory sausage filling mixed with spinach,onion, cream cheese, Parmesan, and of course garlic. The sausage is cooked and then mixed with the cheese. Once the filling is mixed I set it aside and mixed the dough.


Next was the rolling of the dough and filling the pirogi. I bought a dough press set at a yard sale for $1.00 - can't beat that... made it easier to cut the circles and fill the pockets, but I still pressed with the fork in the end so the edges weren't too thick.


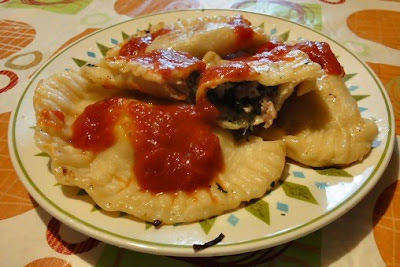
Now they were sealed and ready! I cooked them in batches in boiling water... noting of course they were ready when they floated to the top! ;) After they were cooked I put them in a frying pan and sautéed them with fresh chopped basil and butter until they had a light golden crisp on the tops and bottom. The picture below shows the final product, served with a tomato gravy. I was thinking some nice chopped and seasoned tomatoes would make a tasty garnish as well....but that was an after thought- they were already eaten before I could try that!


These were enjoyed by hubby, and I would definitely make them again. It's easier then you think! Thanks again to the daring kitchen for this wonderful challenge. And thank you dear reader for stopping by and checking out my blog.♥
-----------------------------------------------------------------
The Recipe:
I would suggest preparing the filling first and then making the dough....

Dough:
2 to 2 1/2 cups flour
1tsp salt
1 egg
1 cup Luke warm water

I started with 2 cups and added more flour as needed depending on consistency of the dough. Put the flour in a large bowl and make a well in the center. Crack the egg in there, add the salt , and a little Luke warm water at a time. Knead the dough adding more flour or water as needed. You want a nice soft dough. From into a ball. Cover the dough and let sit for 20 minutes.

Filling:
1lb bulk sweet or mild Italian sausage
1/2 medium to small onion-chopped
1 clove of garlic chopped fine
1 cup (8oz) spinach fresh or frozen-thawed and drained
4oz cream cheese
1/2 Parmesan cheese
slat and pepper to taste

In bowl add the cream cheese and Parmesan , set aside.
In frying pan, heat the sausage ,onion & garlic until cooked through and meat is no longer pink. Add the spinach and toss until heated through. Add to bowl- heat will melt the cheese- mix all well. Set aside so it cools and will be ready to use as filling.
(NOTE: I had to make to batches of the dough to use up all the filling and all remaining pierogi were frozen for another day!)

On floured surface, roll the dough out to aprox. 1/8 inch think. Cut with 2 inch round cookie cutter, dough press,or round glass. Spoon a portion of filling on the middle of each circle. Fold dough in half, pinch the edges together. Re roll any scraps of dough and repeat.

Bring a pot of salted water to boil. Drop pierogi in batches, not too many at once. Bring to a boil again and reduce heat slightly, wait for the pierogi to rise to the top and let simmer for about 5 minutes - they're finished!

Friday, July 16, 2010

Daring Kitchen July Challenge Reveal.

The July 2010 Daring Cooks' Challenge was hosted by Margie of "More Please" and Natashya of "Living in the Kitchen with Puppies". They chose to challenge Daring Cooks to make their own nut butter from scratch, and use the nut butter in a recipe. Their sources include 'Better with Nut Butter' by Cooking Light Magazine, Asian Noodles by Nina Simonds, and Food Network online.
I chose to try the **Walnut & white bean dip w/ Rosemary & Sage, the **Chicken with Pecan cream & mushroom sauce, and the Asian Noodle-shrimp with Peanut sauce.
** These two recipes will be Linked at the end of this post.

I'm so glad to have had the opportunity to learn about nut butters. The most common nut butter we all know is peanut butter. Making your own is so much better then buying. I can't wait to make traditional Italian pignoli cookies at Christmas with my own almond butter too, now that I know how easy it is!! For more information on Nut Butters and how to make them & what they're used for, go here :

The first Project was the dip. I started with the walnut butter then added the rest of the
ingredients as demonstrated in the following photo.


The Dip was a hit with my family. The finished product is pictured below. I would certainly make this for a party again!


Next is the Chicken with the pecan cream & mushroom sauce. Pecans are my favorite so I was looking forward to this one.The picture below shows the bowl with the pecan butter and the rest of the prep for making the dish.

This following picture is the finished dish. I was disappointed that it was rather bland. One tip: it calls for being served over egg noodles. I ate it that way- MUCH BETTER then served over rice like my husband wanted it. I'm not sure why that made a difference but, it did.

The Asian dish of shrimp with peanut sauce was definitely outside our comfort zone. This seemed really simple to make but did not go well with the family. The picture below is the peanut sauce.


The picture below here is the finished dish. It looks yummy but no one liked it except me. I think maybe it would have been better to try with chicken and ease my husband into it...lol. He is not a big peanut butter fan as it is but he could not stand the combination with shrimp.
Maybe one of you will have better luck then I did..... I think, however, I will revisit this with my good friend who is known for his Asian cooking.....

I'm glad again for the experience and all the work that goes into arranging these challenges. Make sure to check out The Daring Kitchen as well !!


WHITE BEAN DIP with Rosemary & sage from "Cooking Light"- but link led to (myrecipes.com):

CHICKEN with Pecan cream & mushrooms adapted from "Cooking Light":

Asian Cashew Dressing ( I used peanut) adapted from "Chinese Peanut Dressing" pg 22 in Asian Noodles by Nina Simonds


Monday, June 21, 2010

Daring Kitchen challenge 2 - for July

The Challenge for July has been posted and the reveal date is July 14
stick around and make sure to check back mid july for the reveal, who knows what antics I'll get into now. Wish me luck with the new food processor too! (This is the 3rd one I'm dealing with!) ..lol...


To see last month's challenge Check it out HERE

Wednesday, June 16, 2010

JUNE -Daring Kitchen Challenge Reveal!

Our hostesses this month, Evelyne of Cheap Ethnic Eatz, and Valerie of The Chocolate Bunny, chose delicious paté with freshly baked bread as their June Daring Cook's challenge! They've provided us with 4 different paté recipes to choose from and are allowing us to go wild with our homemade bread choice.

Since I've never made bread before, I decided to try the *French Baguette.

For the paté, I chose to make the * Tricolor vegetable recipe. It worked well for an appetizer at the last dinner party we hosted. After this experience I'm excited to try more- my imagination was running wild on all the different combinations and things I can try in the future. I'm so happy to have tried something I never thought of before~!
(* links to the recipes I used are at the end)

Thank you for a fabulous Challenge....
For some insight on what an adventure this was for me, see my previous post HERE ~And if you read my story, you'll know what 's wrong with this picture.lol


The beginning steps:I was excited about using fresh herbs I picked from our new garden! I always wanted an herb garden! The first layer of the paté is in the bowl ;)

This picture is the result of my first time making Bread.

As an afterthought, I shined it up a bit by rubbing a little bit of EVOO ...after I had already put the camera away ...of course....

This is the picture of the final presentation.

I plated it on some fresh~picked~from~my~garden lettuce and put a few sprigs of fresh thyme as a garnish. (Can you tell I'm excited about having a garden for the first time in my life!! lol)

The paté was well received - many surprisingly liked it! Even my picky eaters!! I already have many different ideas & can't wait to experiment with ingredients!!
... and I LOVE using my new food processor for the paté as well!!
(refer to story~link above.....lol)

Thanks again Daring Kitchen---
Challenge yourself in the kitchen! Join the Darking Kitchen site!!!


Here are the recipes if you'd like to try them yourself!

Wednesday, June 2, 2010

Daring Kitchen Challenge -

It has begun......
This ought to get interesting...lol..but I am excited about starting to show photos of my accomplishment. This blog was basically just a "storage" place for recipes so I never really thought about adding photos of the finished dishes before. I know I always like a photo of the recipe when I see it! ;)

Keep an eye out here as the "reveal" won't be until after June 14th !!!
I think instead of just throwing recipes up to store, I'm actually going to start using this blog and have some fun with it!!

~~~~~~~~~~~~~~~~~
The adventure...so far....
My food processor gave out on me so I was happy that with this challenge I get a new one! Yay me! ... not so much though.....I tried to use it tonight and it was so LOUD! Next thing I know it's starting to smoke! Luckily it didn't explode but there were black burnt plastic marks left on my counter top! Guess what we're doing tomorrow- returning it :(
I'm mid way on the recipe. My husband thinks I should start over with the new food processor.
We'll see what happens.... fingers crossed I don't get a "lemon" again.
~~~~~~~~~~~~~~~~~~~~~~~~~~~~~~~~~~~~
AND more.....
Think I got a decent processor this time! Worked like a breeze. I was so excited to use it and continue with the recipe challenge that I didn't pay attention what I pulled out of the garden.
I thought My husband planted flat leaf parsley in the garden, but it seems that is still in the pot to be transplanted. When I did a taste test of the *"blend" I was to make, what a surprise to find- it was Cilantro!!! Oh my ... I really need to pay closer attention to what I yank out.... ugh... so.. I had to start over....again...... lol
(* I can't say what I'm making yet... it's a surprise- after the 14th I'll reveal!!)
EDIT : It was a pesto layer in the paté, so imagine the surprise when it was supposed to be basil and parsley not basil and cilantro! - It's a bit harsh!


AND STILL MORE (6-19)
IT seems in using this latest food processor there is a major design flaw that causes it to leak all over. The processor came with nested bowls- a 4 cup small nested in the large 9 cup. The larger bowl however showed a "stem" about a half inch tall where the blade rested. I knew this was going to be bad.... it says in the book that comes with it , the processor is not meant to liquefy raw fruits or vegetables- I'm fine with that....but when making a large batch of Brushetta, or a nice mango pineapple chipolte - they tend to be nice a juicey- well ...that didn't work... leaked all over the counter. Now if I have to make them with the small bowl in batches, what's the point of paying the high amount for a large processor you can't use ??? I could have just got a small one for half the price.....yep......back it goes..... and this time... I went someplace else, spent another $50 (on top of the $200 already dished out...) and I bought a REALLY good one with all the amenities I wanted, nested bowls, has a high center too - plus a "seal tight advantage", a housing "garage" for the other blades & accessories, and even has a dough blade, adjustable slicer for thin to thick , small and wide mouth feeds for larger foods!
LESSON LEARNED: Trying to be frugal for a heavily used kitchen appliance equates to cheapness that just fails. I'm very happy with the investment I made !


**************************************
(update: The reveal is now HERE !!!)
***************************************

Saturday, May 29, 2010

Bluberry Tarts with Maple syrup- good for diabetics

Since I'm finding more and more people in my life are diabetics, I've been trying more recipes for diabetics - they're healthier and they help you loose weight ;)

BLUEBERRY TARTS (FAMILY CIRCLE MAGAZINE)

Serves 8, makes 4 tarts: 281 calories, 12 fat, 3 protein, 42 carbs, 2 fiber

INGREDIENTS
PASTRY:
1 1/2 cups all purpose flour
1/4 teaspoon salt
1/2 cup (1 stick) cold unsalted butter, cut in pieces
1 tablespoon maple syrup
BLUEBERRY FILLING:
2 6oz packages fresh blueberries (about 2 cups)
1/2 cup maple syrup
1/4 cup cornstarch
1 teaspoon lemon zest ( I used about 1/2 to a tsp of lemon juice)
DIRECTIONS
1. Pastry: in a medium bowl, whisk together flour and salt. Add butter an dmix into flour with a pastry blender or your fingers until crumbly. In a small bowl, stir together maple syrup and 1/4 up plus 1 teaspoon cold water. Add water mixture to flour mixture and toss together with a fork until dough begins to come together. Gather dough into a ball; divide in 4 equal pieces. Flatten each into a disc, wrap in plastic and refrigerate 2 hours.

Blueberry filling: Place blueberries in a large bowl. In a small bowl, stir together maple syrup, cornstarch and lemon zest. Gently combine with blueberries. Set aside.

Heat oven to 375.
Roll out one pastry disc to an 8-inch circle. Transfer to a nonstick baking sheet. Fold over 1/2 inch of dough all around pastry, forming a decorative edge. Repeat with remaining pastry. Divide blueberry mixture evenly among pastry rounds, about 1/2 cup in each (spread berry mixture in a *single layer*).

Bake tarts at 375 for 35 minutes, until pastry is browned and filling is set.


Notes: I actually split the dough down further and made individual size tarts instead of one pie size one for two people. It worked out well- I kept an eye on it while cooking but it cooked for about the same time. Everyone loved them! Best of all the maple syrup I used was given to me by a neighbor who harvested it fresh!

Monday, March 29, 2010

bow tie beef skillet

This was a hit with the guys- they ate it all up even when I doubled the recipe!

1 lb ground beef
1/2 tsp salt
1/8 tsp pepper
2 cups uncooked pasta , bow tie- or I used mafalda noodles
1 can (14 1/2 oz)diced tomatoes- drained
1 1/3 cup beef broth
1 can (8oz) tomato sauce - *
1 tblsp Worcestershire sauce
3 medium yellow summer squash thinly sliced (optional - I didn't use it!!)
3/4 cup chopped green peppers
1 cup shredded Parmesan cheese, divided

in large skillet cook beef over medium heat for 4-5 minutes or until meat is no longer pink; drain. Sprinkle with salt and pepper. Stir in the pasta, tomatoes, broth, tomato sauce & Worcestershire sauce. Bring to boil. Reduce heat;cover and simmer for 10-12 minutes.
Add squash and green pepper. Cook, uncovered, 3-4 minutes longer or until pasta and veggies are tender, stirring occasionally. Add 1/2 cup of the cheese- cook another 1-2 minutes or until cheese is melted. Sprinkle remaining cheese on top to serve....

*NOTES: This is quite tastier then it sounds. I used mozzarella on top when severed;I didn't have tomato sauce and used spaghetti sauce(with garlic and onion) instead. Also I mixed some mozzarella with the parmesan into the "sauce". I had to double the recipe to feed four of us~ the guys are big eaters ;).

* yield 5 servings.

Mile high peanut-butter brownie pie

It's easier then it may sound. Robin made this and OMG it's the BEST dessert ever!!! so yummy and gooey too.....

1 refrigerated pie crust-softened as directed on box
1 box (aprox 15.5 oz) pillsbury chocolate chunk brownie mix....
( we couldn't find this and used a generic chunky brownie mix that was about 20 oz)
1/4 cup peanut butter chips
1/3 cup vegetable oil
3 tablespoons water
1 egg
1 pack (8oz) cream cheese, softened
1/2 cup creamy peanut butter
1 cup powdered sugar
1 80z frozen whipped topping, thawed
2 tablespoons peanuts- chopped
2 tablespoons mini chips- semi-sweet chocolate.

Heat oven to 350 degrees. Unroll pie crust; place in greased 9 inch glass pie plate as directed on box for one crust filled pie - flute edge.
in medium bowl ,stir brownie mix, peanut butter chips, oil, water and egg. 50 strokes with a spoon. Pour batter into crust-lined pie plate.
Bake 30-40 minutes, covering edge of crust with strips of foil after 15-20 minutes . Refrigerate 1 hour or until completely cooled.
in medium bowl, beat cream cheese, peanut butter, & powdered sugar with electric mixer on medium speed until smooth. fold in whipped topping.
spread mixture over brownie. Sprinkle with peanuts and chocolate chips. Refrigerate 30 minutes before serving. Store covered in frig'.

Cheesy baked rice

Made by Robin- very yummy!

2tbsp unsalted butter(1/4 stick) plus extra to coat baking dish.
6 scallions- end trimmed and white & light green parts thinly sliced
1/2 medium yellow onion, finely chopped
3 medium garlic cloves finely chopped
2 1/2 tsp kosher salt (we used sea salt I had in a grinder)
1/2 tsp freshly ground black pepper
1 3/4 cups long grain rice
3 cups low sodium chicken broth
1 cup heavy cream
1 1/2 cup shredded extra sharp white cheddar cheese

Heat oven to 350 degrees and arrange a rack in the middle. Coat a 13x9 inch baking dish with butter and set aside..
Melt butter in a large frying pan over medium heat. When it foams, add scallions, yellow onions, garlic and 1/2 tsp salt and pepper. cook, stirring occasionally, until vegetables are tender but not browned- about 7 minutes.
Add rice and stir to coat in butter. Add broth, cream, and remaining 2 tsp of salt. Bring to simmer, stirring frequently. Remove from heat, stir in 1 cup of cheese, pour in prepared dish and spread evenly. Cover with foil and bake until most of the liquid has been absorbed and rice is cooked thoroughly. About 30 minutes.

Uncover, evenly sprinkle remaining 1/2 cup cheese over top and continue baking until rice is tender and cheese is golden, about 15-20 minutes more.

Better then sex cake

This is really gooey and delicious! Made by Robin- thanks for this wonderful dessert- I hope I can make it as great as you did!!

1 chocolate cake mix
1 jar of chocolate fudge (we used smuckers)
1 jar of caramel sauce
1 can condensed sweetened milk
1 80z container whipped cream
2 Skor bars-crumbled heath bars work too

Bake cake according to box
Let cool completely. Once cooled- pour sweet condense milk over entire cake and allow time to absorb.
Spread thin layer of fudge over top then layer of caramel.
finish with whipped cream as icing ;) Drizzle more fudge and caramel on top.
Sprinkle crushed candy bar over cake - serve and enjoy!

Thursday, February 11, 2010

chocolate cake from scratch- two ways

3 c. flour
2 c. sugar
2 tsp. baking soda
1 tsp. salt
1/3 c. cocoa
2 tbsp. vinegar
1 tsp. vanilla
3/4 c. cooking oil
2 c. cold water

Mix dry ingredients well and add liquid ingredients and beat by hand. Pour in 9 x 13 inch pan. Bake at 350 degrees for 35 to 40 minutes. Mix ingredients by hand - DO NOT USE MIXER.

FROSTING:
4 tbsp. butter
4 tbsp. milk
1 c. sugar
Boil 1/2 minute. Add 1/2 cup chocolate chips.

*NOTES -something doesn't seem right in this first recipe- but I am going to try it- will let you all know if it works.... and this is the reason for the 2nd recipe- that one seems more like it ;)

---------------------------------------------------------------------------------
from about.com

Thiscake recipe is simple to make. A dark chocolate cake is frosted with a lighter cocoa frosting.
Prep Time: 25 minutes

Cook Time: 35 minutes

Ingredients:

2 cups flour
2 cups sugar
3/4 cup cocoa
1-1/2 teaspoons baking soda
1-1/2 teaspoons baking powder
1/4 teaspoon salt
2 eggs
1 cup whole milk
1/2 cup oil
2 teaspoons vanilla
1 cup boiling water
Preparation:

Preheat oven to 350 degrees F. Grease and dust with cocoa two 9" layer cake pans. Set aside.
In large bowl, combine flour, sugar, cocoa, baking powder, baking soda, and salt. Stir with wire whisk until blended. Add eggs, milk, oil, and vanilla and beat well with wire whisk or mixer until combined, about 2 minutes. While beating, heat water in microwave oven to boiling. Stir boiling water into cake batter.

Pour the thin batter into the two prepared pans. Bake at 350 degrees F for 30-35 minutes or until cake pulls away from sides of pan, top springs back when lightly touched, and a toothpick inserted in center comes out clean. Cool 5 minutes, then remove from pans and cool completely on wire racks.

FROSTING:
This frosting can be used to frost any cake or cookie.
Prep Time: 15 minutes

Ingredients:

1/2 cup butter
2/3 cup cocoa
4-1/2 cups powdered sugar
1/3-1/2 cup half and half
1 tsp. vanilla extract
pinch salt
Preparation:

In large saucepan, melt together butter and cocoa. Stir until smooth. Using mixer, alternately beat in powdered sugar and milk until frosting is smooth and creamy. Stir in vanilla and salt. Fills and frosts 2 9" cake layers.

Tuesday, February 9, 2010

TIPS!

Take your bananas apart when you get home from the store.
If you leave them connected at the stem, they ripen faster.

Store your opened chunks of cheese in aluminum foil.
It will stay fresh much longer and not mold!

Peppers with 3 bumps on the bottom are sweeter and better for eating.
Peppers with 4 bumps on the bottom are firmer and better for cooking.

Add a teaspoon of water when frying ground beef.
It will help pull the grease away from the meat while cooking.

To really make scrambled eggs or omelets rich add a couple of
Spoonfuls of sour cream, cream cheese, or heavy cream in and then beat them up.

For a cool brownie treat, make brownies as directed. Melt Andes mints in double broiler and pour over warm brownies. Let set for a wonderful minty frosting.

Add garlic immediately to a recipe if you want a light taste
of garlic and at the end of the recipe if your want a stronger taste of garlic.

Leftover snickers bars from Halloween make a delicious dessert. Simply chop them up with the food chopper. Peel, core and slice a few apples. Place them in a baking dish and sprinkle the chopped candy bars over the apples. Bake at 350 for 15 minutes!!! Serve alone or with vanilla ice cream. Yummm!

Heat up leftover pizza in a nonstick skillet on top of the stove, set heat to med-low and heat till warm.
This keeps the crust crispy. No soggy micro pizza. I saw this on
the cooking channel and it really works.

Easy deviled eggs, Put cooked egg yolks in a zip lock bag. Seal, mash till they are all broken up.
Add remainder of ingredients, reseal, keep mashing it up mixing thoroughly, cut the tip of the baggy, squeeze mixture into egg. Just throw bag away when done easy clean up.

Expanding Frosting
When you buy a container of cake frosting from the store, whip it with your mixer
for a few minutes. You can double it in size.
You get to frost more cake/cupcakes
with the same amount. You also eat less sugar and calories per serving.


To warm biscuits, pancakes, or muffins that were refrigerated, place them in
A microwave with a cup of water. The increased moisture will keep the food

Moist and help it reheat faster.

Before you pour sticky substances into a measuring cup, fill with hot water.
Dump out the hot water, but don't dry cup. Next, add your ingredient, such
As peanut butter, and watch how easily it comes right out.